Table of Contents

Preparatory Steps
Remove
Clean and Inspect for Reuse
Install
Finishing Steps


Preparatory Steps

TOC
 WARNING 

Batteries can emit explosive gases. To reduce the possibility of personal injury, always ventilate the compartment before servicing the batteries. To reduce the possibility of arcing, remove the negative (-) battery cable first and attach the negative (-) battery cable last.
 WARNING 

To reduce the possibility of personal injury, avoid direct contact of hot oil with your skin.
 WARNING 

Some state and federal agencies have determined that used engine oil can be carcinogenic and cause reproductive toxicity. Avoid inhalation of vapors, ingestion, and prolonged contact with used engine oil. If not reused, dispose of in accordance with local environmental regulations.


SMALL | MEDIUM | LARGE


Remove

TOC

Remove the ten lock nuts from the noise panel (if equipped).

Remove the noise panel (if equipped) from the oil pan.


SMALL | MEDIUM | LARGE
   

Remove the oil pan mounting capscrews, oil pan clamping plate, and the oil pan.

Remove and inspect the flywheel housing dust shield at the back of the oil pan.

Replace the dust shield if necessary.


SMALL | MEDIUM | LARGE


Clean and Inspect for Reuse

TOC
 WARNING 

When using a steam cleaner, wear safety glasses or a face shield, as well as protective clothing. Hot steam can cause serious personal injury.
 WARNING 

Wear appropriate eye and face protection when using compressed air. Flying debris and dirt can cause personal injury.

Remove all of the gasket material from the cylinder block and the oil pan surfaces.

Steam clean the oil pan and dry with compressed air.


SMALL | MEDIUM | LARGE
   

Inspect the inside and the outside of the oil pan for cracks around the suction tube mounting studs.

Check for a cracked or broken suction tube mounting clip.

Replace if cracked or broken.


SMALL | MEDIUM | LARGE
   

Inspect the clamping plate for cracks around the mounting holes.

Replace the clamping plate if cracked or broken.


SMALL | MEDIUM | LARGE


Install

TOC

Apply a 12.7 mm [0.05 in] bead of RTV sealant to the rear cover, block, front cover, and block mounting faces.

The bead must extend the full width of the flange.


SMALL | MEDIUM | LARGE
   

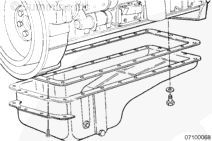
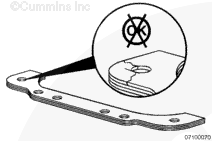
Install a new oil pan gasket.

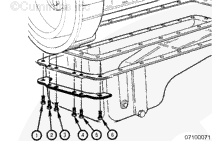
Capscrews 1 through 6 are longer than the rest of the oil pan capscrews to accommodate the thickness of the clamping plate.

Install and finger tighten one of the 11.0 mm [7/16 in] oil pan mounting capscrews on each side of the oil pan, halfway between the front and the rear of the oil pan.

Install the clamping plate and capscrews.

Install the flywheel housing dust seal under the correct oil pan capscrews.

Install and finger tighten the remaining capscrews.


SMALL | MEDIUM | LARGE
   

Tighten the four 8 mm [5/16 in] capscrews in the rear of the oil pan in the sequence illustrated.

Torque Value:  27  n.m  [239 in-lb]

Tighten the thirty-two 11 mm [7/16 in] capscrews in the sequence illustrated.

Torque Value:  68  n.m  [50 ft-lb]


SMALL | MEDIUM | LARGE
   

Install the noise panel and lock nuts, if equipped.

Tighten the lock nuts.

Torque Value:  20  n.m  [177 in-lb]


SMALL | MEDIUM | LARGE


Finishing Steps

TOC
 WARNING 

Batteries can emit explosive gases. To reduce the possibility of personal injury, always ventilate the compartment before servicing the batteries. To reduce the possibility of arcing, remove the negative (-) battery cable first and attach the negative (-) battery cable last.
 WARNING 

To reduce the possibility of personal injury, avoid direct contact of hot oil with your skin.
 WARNING 

Some state and federal agencies have determined that used engine oil can be carcinogenic and cause reproductive toxicity. Avoid inhalation of vapors, ingestion, and prolonged contact with used engine oil. If not reused, dispose of in accordance with local environmental regulations.


SMALL | MEDIUM | LARGE


Last Modified:  29-Sep-2011
Feedback / Help