Table of Contents

Remove
Inspect for Reuse
Install


Remove

TOC

Loosen the capscrews which secure the fan hub shaft to the bracket.

NOTE: Both two capscrew and four capscrew designs are available.

 
SMALL | MEDIUM | LARGE

Turn the adjusting screw counterclockwise to release tension, and remove the belts.


SMALL | MEDIUM | LARGE
   

Inspect the pulleys for cracks or broken grooves. Replace if damage is found.


SMALL | MEDIUM | LARGE


Inspect for Reuse

TOC

Inspect the belts for cracks, glazing, and tears or cuts.

Replace the belt set if one or more of the belts are damaged.

 
SMALL | MEDIUM | LARGE
   

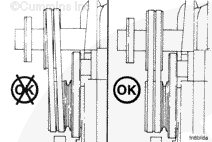
Inspect the pulley alignment. Pulley misalignment must not exceed 0.5 mm per cm [0.0625 in per foot] of distance between the pulley centers. Inspect, repair, or replace the fan hub or the fan hub support bracket if pulley misalignment exceeds 0.5 mm per cm [0.0625 in per foot]. Refer to Procedure 008-036 in Section 8.


SMALL | MEDIUM | LARGE


Install

TOC

Install new belts onto the pulley. When a drive pulley uses two or more belts, replace the belts as a complete set.

NOTE: To prevent damage, do not roll a belt over the pulley or pry it on with a tool.


SMALL | MEDIUM | LARGE
   

Turn the adjusting screw to increase the belt tension.

NOTE: Belt tension can increase when the fan hub mounting capscrews are tightened. Do not adjust the belt tension to full value with the adjusting screw.

 
SMALL | MEDIUM | LARGE
   

Tighten the capscrews until the fan hub is in correct alignment with the fan hub bracket.

NOTE: Do not tighten the capscrews to full torque value.

Measure the belt tension.

 
SMALL | MEDIUM | LARGE
   

Refer to the Belt Tension Chart shown in Section V to select the correct gauge and tension values for the belt width.

A belt is considered used if it has been in operation for at least 10 minutes.


SMALL | MEDIUM | LARGE
   

Tighten the fan hub mounting capscrews.

Torque Value:   108  n.m  [80 ft-lb]

Measure the belt tension again using belt tension gauge, Part Number ST-1138, and adjust if necessary.


SMALL | MEDIUM | LARGE
   

When satisfactory belt tension is obtained, loosen the adjusting screw 1/2-turn to prevent breakage.

 
SMALL | MEDIUM | LARGE


Last Modified:  21-Nov-2011
Feedback / Help